Create A Huge File(For fun)
You can create a file of any size using nothing more than what's supplied with Windows.
Start by converting the desired file size into hexadecimal notation.
You can use the Windows Calculator in Scientific mode do to this.
Suppose you want a file of 1 million bytes. Enter 1000000 in the calculator and click on the Hex option to convert it (1 million in hex is F4240.) Pad the result with zeroes at the left until the file size reaches eight digits—000F4240.
Showing posts with label How To. Show all posts
Showing posts with label How To. Show all posts
Create An Ftp Server On Your PC
Thursday, August 26, 2010 0 comments
Create FTP server on your PC
Process-1:
First of all you have to get an static IP-Address.
Need a static ip-address for your FTP Server.Necessity for getting this static ip-address is your not suppose to use your own IP-Address.The main reason is you don't want to show your IP-Address to everyone , there are many other reasons too but leave them aside..
Process-1:
First of all you have to get an static IP-Address.
Need a static ip-address for your FTP Server.Necessity for getting this static ip-address is your not suppose to use your own IP-Address.The main reason is you don't want to show your IP-Address to everyone , there are many other reasons too but leave them aside..

How to Add a Live Traffic Feed to your Website or Blog
Tuesday, June 1, 2010 0 commentsEver wonder where all the traffic is coming from on your website or blog? In this article you will learn how to easily add a free traffic widget to your website or blog that will show you your traffic statistics in real-time.
Things you will nedd for this: A website or blog
Follow these steps.
- Step 1:It's easy to show real time traffic statistics on your website or blog with FEEDJIT's cool widgets. Just cut and paste the FEEDJIT widget to your website or blog, that's it. There is no registration required which makes it even easier and it's completely free.
Find ip address of the sender of a mail in Gmail, Yahoo and Hotmail
Friday, May 28, 2010 0 comments
When you receive an email, you receive more than just the message. The email comes with headers that carry important information that can tell where the email was sent from and possibly who sent it. For that, you would need to find the IP address of the sender. The tutorial below can help you find the IP address of the sender. Note that this will not work if the sender uses anonymous proxy servers.
How to Increase the Size of Command Prompt Window
Sunday, December 6, 2009 0 comments
The command window shows only 25 lines when it is called up. This is too little to display longer text stretches such as help pages. Here is a simple way to increase the size of the command prompt window and thus increase the number of lines displayed:
Right Click on the upper left corner of the command prompt window and select ‘Properties’.
Then switch to the ‘Layout’ tab. Change the ‘Height’ value under ‘Window Size’
Set it at ‘50’, for instance. You can retain the default width of 80 characters since most editions take this as the default value and have also integrated a line break at this point.
You can also immediately see whether and how the window thus defined fits your screen size in the preview, so that you can make your changes accordingly.
Also increase the ‘Height’ under ‘Screen Buffer Size’ to ‘600’, for instance.
This number indicates the number of lines the command prompt notes and through which you can scroll back. This is most practical for the display of long help texts.
Confirm this setting with ‘OK’ and then close the command prompt.
The new values will be valid the next time you call up the command prompt and you can use it with your own settings. Here is a way to change color and customize the command prompt.
Right Click on the upper left corner of the command prompt window and select ‘Properties’.
Then switch to the ‘Layout’ tab. Change the ‘Height’ value under ‘Window Size’
Set it at ‘50’, for instance. You can retain the default width of 80 characters since most editions take this as the default value and have also integrated a line break at this point.
You can also immediately see whether and how the window thus defined fits your screen size in the preview, so that you can make your changes accordingly.
Also increase the ‘Height’ under ‘Screen Buffer Size’ to ‘600’, for instance.
This number indicates the number of lines the command prompt notes and through which you can scroll back. This is most practical for the display of long help texts.
Confirm this setting with ‘OK’ and then close the command prompt.
The new values will be valid the next time you call up the command prompt and you can use it with your own settings. Here is a way to change color and customize the command prompt.
How to Change Color and Customize Command Prompt
0 comments
The typical grey-on-black theme of your command prompt can get boring. There are a few changes that can be made to the command prompt to look a little friendlier. The prompt itself can be customized, which by default displays C:\ or the path you’re currently on. This means you can change the path of the prompt. Here is how you can customize the Command Prompt..
The prompt can be changed by typing PROMPT followed by the parameters. PROMPT $P$G will restore the prompt to the default one.
Some of the parameters that can be used are as follows..
The prompt can be changed by typing PROMPT followed by the parameters. PROMPT $P$G will restore the prompt to the default one.
Some of the parameters that can be used are as follows..
Defragment Drives Easily from Right Click – Context Menu
0 comments
For the system to work smoothly, the hard disk must be defragmented regularly. However, using the Start menu to open the Disk Manager each time becomes cumbersome. With an entry in the registry, you can expand the context menu for disk drives to include the command to defragment them directly from the right click context menu.
Select ‘Start > Run’, enter ‘regedit’ and press [Enter].
In the Registry Editor, navigate to the key
Under that create the sub-key ‘Command’ for the actual program call.
Now select the ‘Command’ key by clicking it and then double-click on the character string ‘Default’ in the right pane.
In the following dialog box, enter the ‘Value data’ with the following command ‘Defrag.exe %1’. The variable ‘%1’ gives the selected disk drive letter to the tool ‘defrag.exe’.
Close the registry.
The change is immediately effective without having to restart the computer. Now as soon as you right-click on any drive in Windows Explorer, you can defragment it through the new context menu item you just created.
Note: To create a key in the registry and to use the new context command you must be logged on to the computer with administrator rights.
Select ‘Start > Run’, enter ‘regedit’ and press [Enter].
In the Registry Editor, navigate to the key
‘HKEY_CLASSES_ROOT\Drive\shell’.There, create a sub-key ‘Defrag’ through ‘Edit > New > Key’. This is only the name of the entry in the context menu.
Under that create the sub-key ‘Command’ for the actual program call.
Now select the ‘Command’ key by clicking it and then double-click on the character string ‘Default’ in the right pane.
In the following dialog box, enter the ‘Value data’ with the following command ‘Defrag.exe %1’. The variable ‘%1’ gives the selected disk drive letter to the tool ‘defrag.exe’.
Close the registry.
The change is immediately effective without having to restart the computer. Now as soon as you right-click on any drive in Windows Explorer, you can defragment it through the new context menu item you just created.
Note: To create a key in the registry and to use the new context command you must be logged on to the computer with administrator rights.
How to Disable Right-Clicking or Context Menu Anywhere on the Desktop
0 comments
You can disable context menu or the menu you get when you right click on your mouse. You can use this trick as a prank or you can use this to prevent any one from changing options of your folders and applications by right clicking on them. Here is a way to disable the right-clicking or context menu on the entire Desktop, including the Start Button, Taskbar and the System Tray.
You need to use the Windows registry editor. Start the registry editor by going to Start > Run, typing in “regedit” and pressing [Enter].
You need to use the Windows registry editor. Start the registry editor by going to Start > Run, typing in “regedit” and pressing [Enter].
How to Restore a Deactivated / Missing CD/DVD Drive [Troubleshoot ]
0 comments
If your CD/DVD drive has disappeared from Windows Explorer and the system folder ‘My Computer’. A glance in the device manager shows that obviously there is some serious problem as the entries are marked with a yellow exclamation mark. This is also confirmed by opening ‘Properties’ in the context menu of the device as it reports “Error code 19” and an error in the registry.
This happens when you accidently deactivate your CD/DVD drive. It can be solved with one change to the registry.
The procedure is as follows..
Open the registry editor with ‘Start > Run’, ‘regedit’ and click ‘OK’
To do that, select the successive entries, press [Del], and confirm the security query that will pop up.
After restarting your system, the drive will be available again.
This happens when you accidently deactivate your CD/DVD drive. It can be solved with one change to the registry.
The procedure is as follows..
Open the registry editor with ‘Start > Run’, ‘regedit’ and click ‘OK’
Go to the key HKEY_LOCAL_MACHINE\System\CurrentControlSet\Control\Class\{4D36E965-E325-11CE-BFC1-08002BE10318}.In the right side of the window, delete both values ‘UpperFilters’ and ‘LowerFilters’.
To do that, select the successive entries, press [Del], and confirm the security query that will pop up.
After restarting your system, the drive will be available again.
How to Restore a Lost / Deleted Partition of Hard Disk Drive
0 comments
If you have deleted the boot partition of your hard disk drive by mistake and there is important data on it, Can it be restored? You can always restore partition and recover data using a free data recovery software like TestDisk. It is a free open source program and is very efficient.
TestDisk has been developed with the intention of restoring lost or mistakenly deleted partitions. The program repairs the partition table as well as the boot sector and also rewrites the Master Boot Record (MBR) if required. The most important thing is you can run it using a boot floppy, CD or a USB stick, this is important in cases like this, in which boot partitions are affected. Navigation in TestDisk takes is performed using the arrow keys. Actions are confirmed by pressing [Enter].
TestDisk has been developed with the intention of restoring lost or mistakenly deleted partitions. The program repairs the partition table as well as the boot sector and also rewrites the Master Boot Record (MBR) if required. The most important thing is you can run it using a boot floppy, CD or a USB stick, this is important in cases like this, in which boot partitions are affected. Navigation in TestDisk takes is performed using the arrow keys. Actions are confirmed by pressing [Enter].
How to remove Virus from USB Drives
0 comments
Viruses can easily spread through USB or Pen Drives. Most viruses like ’Ravmon’ , ‘New Folder.exe’, etc are spreading through these Flash Drives. These Viruses are hard to delete even for the Best anti virus applications. So only option is to remove Virus from USB drives Manually , Here is the procedure you have to follow..
How to protect MS Excel file using password?
Thursday, December 3, 2009 0 comments
In Microsoft Excel, you can protect a single cell, group of cells on a worksheet or an entire workbook by applying password so that unauthorized person can not display as well as modify your document. You can apply two types of password.
How to eliminate the needless visual effects for better windows performance?
0 comments
This will help you to increase the performance of your computer by eliminating the needless visual effects. By default windows XP gives you many options in the graphics fields to enjoy maximum graphics. For example, you can add pictures on folders and drop shadow on icon to give you better look but it will effect on the performance of your computer, especially on an older computer. Window XP has many default graphics which is not so useful for a common user, if you re-adjust these graphics then there is less effect on the user activities but the performance of computer will be increase tremendously. Here I will tell you how to choose:
To edit these settings, first you should log onto your computer with administrative rights.
Click Start button and type sysdm.cpl in Run box then press Ok button for next.

Here a dialog box will appear with the title "System Properties", select "Advanced" tab.

Here click on Settings button under Performance area.

When you have done then "Performance Options" dialog box will appear with different options. Here select the Visual Effects tab and choose the settings you want to use for the appearance and performance of windows on this computer.
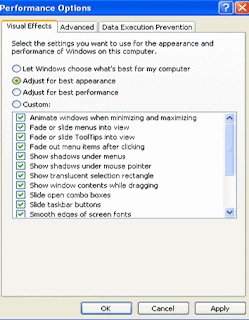
Turns off all the visual effects in the option of "Adjust for best performance" and when you select the option "Adjust for best appearance" it will gives you opposite effect ,Everything will turns on. Selecting "Let Windows choose what's best for my computer" triggers, as you might guess, different choices on different computers. And to pick and choose individual effects yourself, choose "custom" then decide which ones you want.

To edit these settings, first you should log onto your computer with administrative rights.
Click Start button and type sysdm.cpl in Run box then press Ok button for next.

Here a dialog box will appear with the title "System Properties", select "Advanced" tab.

Here click on Settings button under Performance area.

When you have done then "Performance Options" dialog box will appear with different options. Here select the Visual Effects tab and choose the settings you want to use for the appearance and performance of windows on this computer.

Turns off all the visual effects in the option of "Adjust for best performance" and when you select the option "Adjust for best appearance" it will gives you opposite effect ,Everything will turns on. Selecting "Let Windows choose what's best for my computer" triggers, as you might guess, different choices on different computers. And to pick and choose individual effects yourself, choose "custom" then decide which ones you want.

Subscribe to:
Posts (Atom)


